Do you want to learn the simplest way to add custom fields in Projectopia? Before beginning the process to add a custom field let’s know something about the custom field. A custom field is an interface where you can view, input, delete or change a value. Using a custom field you can add data and information to your WordPress posts and pages.
Projectopia’s custom fields for a client allow you to collect more information about the clients. This information can be helpful for finding the relevant type of product or service that is offered. Similarly, the custom fields for task enables you to collect more information that is useful and necessary for your work.
Moreover, Projectopia’s custom fields for invoice lets you add more information to your invoice. You can display more information above the line items in your invoices. Similarly, the custom fields for support ticket allows you to add input for collecting additional information relevant to the support system.
Otto Kasino: Suomalaisen kasinopelaamisen uusi aikakausi
Otto Kasino on tuonut suomalaiseen kasinopelaamiseen uuden aikakauden, joka yhdistää perinteisen kasinoviihteen ja modernit pelikokemukset. Tässä artikkelissa pureudumme syvemmin siihen, miten Otto Kasino on muuttanut suomalaisten pelaajien tapaa nauttia kasinopeleistä. Käsittelemme myös, miten kasinon innovatiiviset ominaisuudet ja laaja pelivalikoima tarjoavat pelaajille entistä monipuolisempia mahdollisuuksia voittaa ja pitää hauskaa.
Mikä tekee Otto Kasinosta niin suosion saavuttaneen pelipaikan suomalaisten keskuudessa? Entä miten se eroaa perinteisistä kasinoista ja miten se vastaa pelaajien muuttuviin tarpeisiin? Luvassa on syvällinen sukellus suomalaisen kasinopelaamisen kiehtovaan maailmaan, jossa yhdistyvät jännitys, viihde ja mahdollisuus voittaa isoja palkintoja. Tervetuloa tutustumaan Otto Kasinon tarjoamiin ainutlaatuisiin pelielämyksiin!
Kasinopelaamisen suosio Suomessa
Otto Kasino on tuonut suomalaiseen kasinopelaamiseen uuden aikakauden tarjoten pelaajilleen laadukkaan ja monipuolisen pelivalikoiman. Sivusto on suunniteltu erityisesti suomalaisille pelaajille, tarjoten käyttäjäystävällisen ja selkeän käyttöliittymän. Otto Kasinolta löytyy laaja valikoima suosittuja kolikkopelejä, pöytäpelejä ja live-kasinopelejä, jotka takaavat jokaiselle pelaajalle unohtumattoman pelikokemuksen.
Uuden aikakauden lisäksi Otto Kasino tarjoaa pelaajilleen houkuttelevia bonuksia ja tarjouksia sekä nopeat ja turvalliset maksutavat. Sivusto panostaa vastuulliseen pelaamiseen tarjoten pelaajilleen työkaluja oman pelaamisen hallintaan. Otto Kasino on noussut suomalaisten pelaajien suosioon tarjoten modernin ja viihdyttävän peliympäristön, jossa jokainen pelaaja voi nauttia suosikkipeleistään turvallisesti ja luotettavasti.
Otto Kasino: Innovatiivinen pelialusta
Ottokasino on suomalaisen kasinopelaamisen uusi aikakausi, joka tarjoaa pelaajilleen monipuolisen valikoiman pelejä ja erinomaisia bonuksia. Sivusto on suunniteltu selkeäksi ja helppokäyttöiseksi, mikä tekee pelaamisesta sujuvaa ja nautinnollista. Ottokasinon tavoitteena on tarjota pelaajilleen viihdyttävä ja turvallinen pelikokemus, joka on suunniteltu erityisesti suomalaisten pelaajien tarpeita ajatellen.
Ottokasinon pelivalikoima kattaa kaikki suosituimmat kasinopelit, kuten kolikkopelit, pöytäpelit ja live-kasinon. Pelaajat voivat nauttia laadukkaasta pelikokemuksesta sekä perinteisissä kasinopeleissä että uusimmissa peleissä. Lisäksi Ottokasino tarjoaa pelaajilleen mahdollisuuden osallistua jännittäviin turnauksiin ja kampanjoihin, joissa voi voittaa upeita palkintoja.
Ottokasino panostaa vahvasti pelaajien turvallisuuteen ja vastuulliseen pelaamiseen. Sivusto tarjoaa erilaisia työkaluja pelaajilleen auttaakseen heitä pelaamaan turvallisesti ja hallitusti. Lisäksi Ottokasino pitää huolen siitä, että pelaajien henkilökohtaiset tiedot ja maksutapahtumat ovat aina suojattuja ja turvassa.
Kokonaisuudessaan Ottokasino edustaa modernia ja innovatiivista lähestymistapaa suomalaiseen kasinopelaamiseen. Sivusto tarjoaa pelaajilleen laadukkaan pelivalikoiman, loistavat bonukset ja ensiluokkaisen asiakaspalvelun. Ottokasino on ehdoton valinta kaikille suomalaisille kasinopelaajille, jotka arvostavat turvallista, viihdyttävää ja vastuullista pelikokemusta.
Vastuullinen pelaaminen Otto Kasinolla
Otto Kasino on suomalaisille suunnattu nettikasino, joka edustaa uutta aikakautta kasinopelaamisessa. Sivusto tarjoaa laajan valikoiman pelejä, joista suuri osa on suunnattu erityisesti suomalaisille pelaajille. Suomalaiset pelaajat voivat nauttia suosituista kolikkopeleistä, pöytäpeleistä sekä live-kasinopeleistä, jotka takaavat viihdyttävän ja jännittävän pelikokemuksen.
Otto Kasino panostaa myös vastuulliseen pelaamiseen tarjoten pelaajilleen erilaisia työkaluja oman pelaamisen hallintaan. Lisäksi sivusto tarjoaa selkeän ja helppokäyttöisen käyttöliittymän sekä nopeat ja turvalliset rahansiirrot, jotka tekevät pelaamisesta sujuvaa ja miellyttävää. Otto Kasino on oiva valinta suomalaisille kasinopelaajille, jotka arvostavat laadukasta ja turvallista peliympäristöä.
Tulevaisuuden näkymät suomalaisessa kasinopelaamisessa
Otto Kasino on tuonut suomalaiseen kasinopelaamiseen uuden aikakauden, joka tarjoaa pelaajilleen ainutlaatuisen ja viihdyttävän pelikokemuksen. Sivusto on suunniteltu erityisesti suomalaisia pelaajia varten, ja se tarjoaa laajan valikoiman suosituimpia kasinopelejä sekä jännittäviä uutuuksia. Otto Kasinon käyttäjäystävällinen ja selkeä käyttöliittymä tekee pelaamisesta helppoa ja nautinnollista kaikille pelaajille, olivatpa he sitten kokeneita konkareita tai vasta-alkajia.
Yksi Otto Kasinon merkittävimmistä ominaisuuksista on suomenkielinen asiakaspalvelu, joka on saatavilla ympäri vuorokauden. Pelaajat voivat saada nopeasti ja vaivattomasti apua kaikkiin kysymyksiin ja ongelmatilanteisiin. Lisäksi Otto Kasino tarjoaa houkuttelevia bonuksia ja tarjouksia, jotka pitävät pelaajat innostuneina ja motivoituneina. Sivusto panostaa myös turvallisuuteen ja vastuulliseen pelaamiseen, joten pelaajat voivat pelata huoletta ja luottaa siihen, että heidän tietonsa ja rahansa ovat hyvässä suojassa.
Otto Kasino on todellinen pelipaikka suomalaisille kasinofaneille, jotka arvostavat laadukasta pelivalikoimaa, ammattitaitoista asiakaspalvelua ja luotettavaa toimintaa. Sivusto tarjoaa kaiken tarvittavan sujuvaa ja viihdyttävää pelikokemusta varten, ja se on osoittautunut suosituksi valinnaksi monille pelaajille ympäri Suomen. Otto Kasino on nostanut suomalaisen kasinopelaamisen uudelle tasolle ja jatkaa varmasti kasvuaan ja kehitystään tulevaisuudessa.
Yhteenvetona voidaan todeta, että Otto Kasino on tuonut suomalaiseen kasinopelaamiseen raikkaan tuulahduksen uutta aikakautta. Tarjoten laajan valikoiman pelejä, houkuttelevia bonuksia ja suomenkielistä asiakaspalvelua, se on nopeasti noussut suosituksi vaihtoehdoksi suomalaisille pelaajille. Innovatiivinen lähestymistapa ja käyttäjäystävällinen käyttöliittymä tekevät Otto Kasinosta varteenotettavan vaihtoehdon niin kokeneille pelaajille kuin vasta-alkajillekin. Tulevaisuudessa Otto Kasino näyttää jatkavan kasvuaan ja vahvistuvan entisestään suomalaisen kasinopelaamisen kentällä.
If you are reading this article right now then we are sure that you want to learn the easiest way to add custom fields in Projectopia Plugin. But before using Projectopia to add custom fields let’s know “Why should you use Projectopia to add custom fields?”
Projectopia is the best selling Project Management Tool that is easy to use, set up and customize. Its custom field will make your task more effective by collecting necessary information about the project as well as the project’s clients. You can keep all of your information in one place, easily accessible and placed on your own WordPress website.
Add Custom Field in Projectopia
Projectopia Project Management plugin allows you to add custom fields for clients, tasks, invoices and support tickets. Don’t worry to perform these tasks as both of the tasks are really simple and can be completed within a couple of minutes.
Now without any further delay let’s proceed forward to learn the ways to add custom fields in Projectopia!
Add Custom Fields for Clients
This section of the plugin allows you to collect detailed and useful information about the profile of the client. Let’s proceed toward the steps:
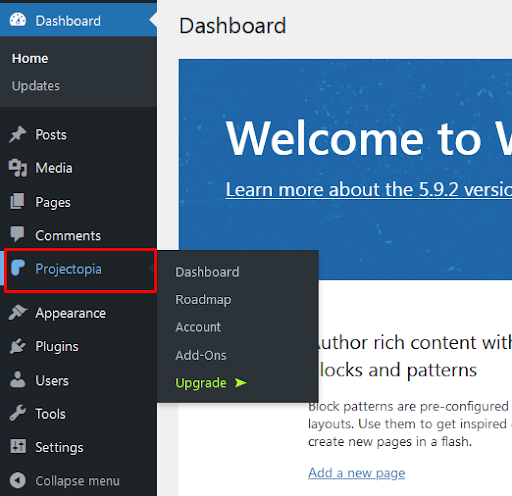
Once the plugin is activated, you can view the Projectopia section on the left sidebar of your WordPress dashboard.
Step 2: Purchase Custom Field Addon
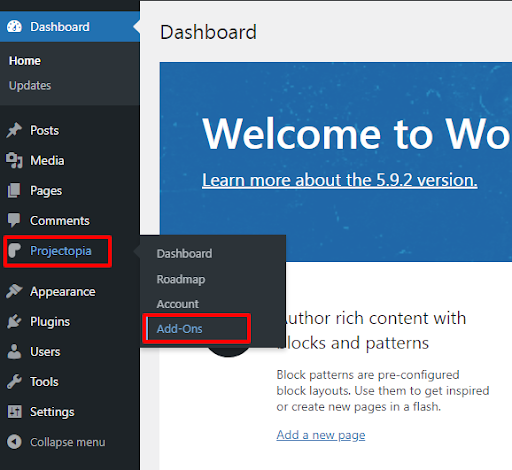
In order to purchase the Custom Field Addon proceed towards Projectopia>>Add-Ons option at the left sidebar of the Dashboard.
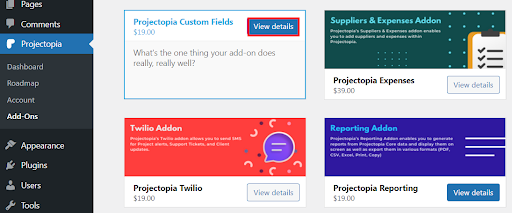
Now, Hover over Projectopia Custom Fields.
Then select View Details.
You will be provided with three different premium plans, select the plan as per your own requirement.
Make sure to fill in the information that is required then you have purchased the addon and it is ready to be used.
Step 3: Add Custom Fields for Clients
The Custom Field Addon is one of the best Projectopia’s Premium Addons that will enable you to add a custom field for your client in backends as well as the client’s Dashboard.
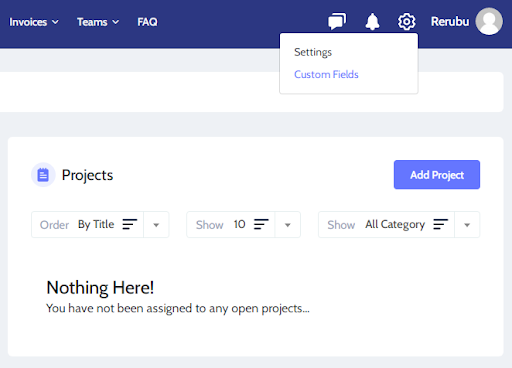
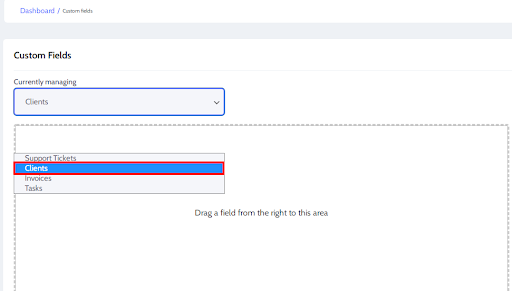
Go to Settings>>Custom Fields to create Custom Fields for Client Profile.
Among 4 options on the dropdown menu, click on the Clients option.
On the right side, you’ll get choices to fill the input.
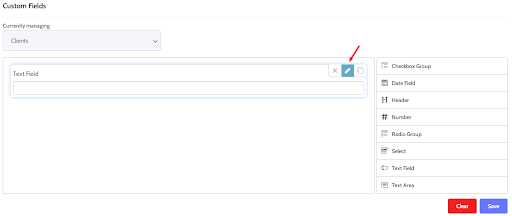
Click on the Text Field form displayed on the right side of the page.
When you click on the option, it will appear in the content area.
Hover over the Text Field form and you will see an Edit option.
Now you’ll be able to add Label, Help Text, Class and Value.
Make changes in this section based on the information that you want to collect.
Click on the Save button once you have made the changes.
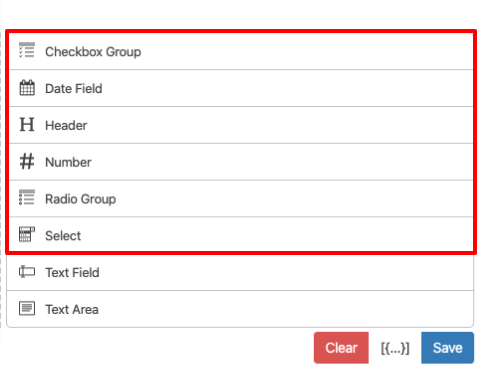
Similarly, make changes in Checkbox Group, Data Field, Header, Number, Radio Group, Select as per your own requirement.
You can also Edit these options if required.
Step 4: Edit a Client
In order to collect the information proceed to the Clients option.
Edit those clients only from whom you need to collect the information.
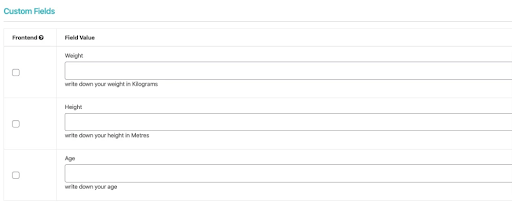
Now you’ll be able to see the form inputs in the Custom Fields Metabox.
In order to make it visible in the PTO clients Dashboard in the profile section check on the Frontend Checkboxes.
Now finally your client will be able to enter the information in his/her profile.
Moreover, you can add custom fields in the Tasks, Invoices and Support Tickets in a similar way as in the Clients.
Wrapping Up:
This is the end of our tutorial guide on ‘How to Add Custom Fields in Projectopia?’ We hope this article helped you to add custom fields in Projectopia in the simplest way. All you need to do is follow these steps without missing any of them.
If you have any kind of confusion while adding the custom fields on clients, tasks, invoices or support tickets do let us know in the comment section below.