
When it comes to project management, team members play a very vital role. Project managers always know that team members are their weaponry for dealing with small or big assignments. Project management is not an isolated process, a project requires a set of people who have different skills, knowledge, and techniques to work on the project.
However, adding team members also means including them in all stages of the projects. Today, project management tools have made communication with clients and team members quick and easy. In this article, I am going to tell you about how you can add team members to Projectopia.
Table of Contents
What is Projectopia?
Projectopia is the no.1 selling tool for WordPress Project Management in CodeCanyon. The reason behind why more than a thousand professionals opt for Projectopia is its oh-so-many features, add-ons, and pricing. You will find features like:
- Quotes and Estimation: where you can add milestones/tasks to a quote. Projectopia also provides functionality to create quote forms for new or existing clients to request quotes from the front end.
- Client Dashboard: You can create a dashboard for your clients so that they can manage their work without accessing the admin’s account.
- Invoice: This feature best contains recurring invoices, partial invoice payment, payment gateway, and much more.
- Team Members: The main reason here to try Projectopia is this feature. You can add team members, convert existing users into members, and team member dashboards.
Besides the above features, there are other important features and add-ons like custom fields, support tickets, WooCommerce Add-on, Subscription Add-on, and much more.
How to add Team Members in Projectopia?
Before starting with the guide on adding team member(s) in Projectopia, let me explain a little about team members and teamwork in a project.
Team members are the individuals assigned to a particular project. It is the effectiveness of these team members and their teamwork that defines a project’s success or failure. It is the people and not the technology that is important to accomplish the project objective. When it comes to teamwork, it is a cooperative effort by team members to achieve a common goal.
Communication is the way to project success, good communication means there are fewer hurdles and more teamwork. The purpose of teamwork in a project is to improve the team’s environment and boost productivity. Along with that, it promotes creativity, encourages risk-taking, brings diverse strengths closer, and much more.
Effective team members should have the following characteristics:
- A high degree of cooperation
- Level of trust
- Clear expectations of each person’s role and responses
- A clear understanding of project objectives
Steps on adding team members.
To start with, go to the Projectopia website and log in to your admin dashboard.
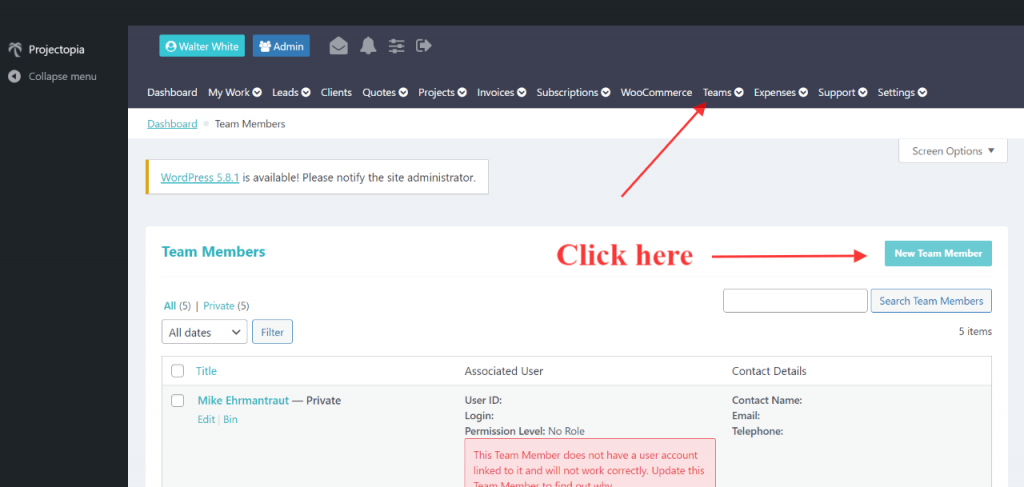
For adding team members in projectopia, navigate to the “Teams” option in the admin menu and click on on the “Team Members” option.
Click on the “New Team Member” button in the right corner. You will then be presented with series of fields to be completed.
Under the “Team Member, Details” column fill in all the details (it is required). Then to save click on the “Update Team Member” button.
(*Note: Once you have updated the login details few processes will take place.
A team member will be created, then a WP user account will be created in WordPress. The user will be linked with the team member and a welcome email with login credentials will be sent to the added member.)
Further scroll down, you will see the open tasks and projects sections. Where the team member will see all the projects and tasks assigned to them.
(Note*: tasks and projects are assigned to team members in the project section.)
Now for providing the team member roles and member permissions. Click on the “Roles and Permissions” under the Team section in the admin panel.
(*Note: Once team members are added their roles by default include access to tasks lists, calendar, and team members dashboard. The permissions for projects and tasks are limited to what they are assigned. However, Projectopia provides roles and permissions matrix where admin can add various roles and extra permissions assigned to team members.)
You will then see two sections one is of roles and other permissions. First, you have to assign member roles in the mentioned boxes under the “Roles” section. You can add as many as member roles by clicking on the green plus button.
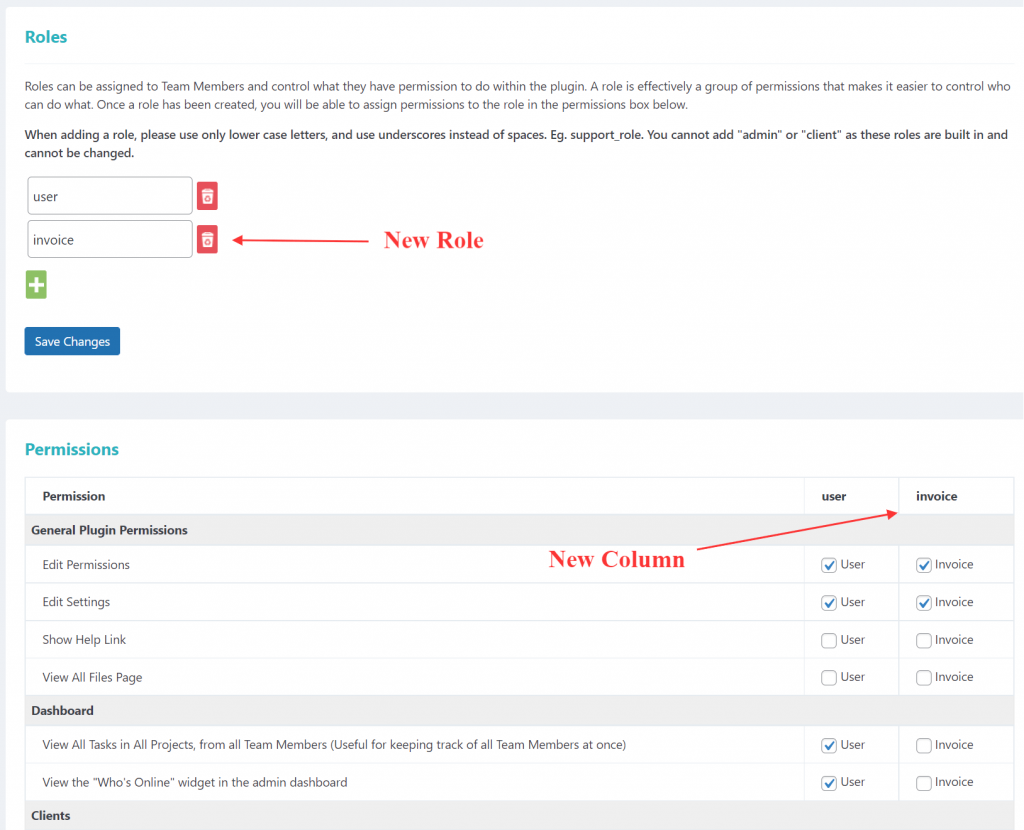
Once member roles are added click on the “Save Changes” button to add the roles.
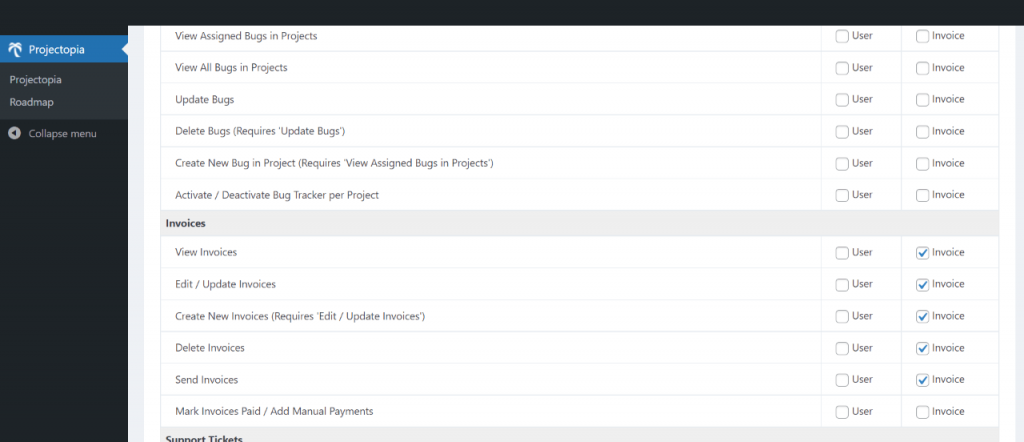
Further, you will see a “Permissions” matrix where a new column will be created based on the roles you have mentioned in the previous section.
You then assign member permissions to it (as shown in the picture below).
This is how you add team members and assign member roles and member permissions.
Wrap Up thought
I hope this article on the guide of how to add team members with the help of Projectopia was helpful.
As I said before, team members make the teamwork and if there is teamwork in a project then it is going to be successful. Besides, now you know about Projectopia so you can just in few steps add team members and make them part of all the communication and tasks.
If you have any queries or suggestions related to this topic or the Projectopia plugin then comment down below.