Since Projectopia Subscriptions Add-on version 1.0.8, we have update our plugin to use Stripe’s Subscription API.
Updating from version 1.0.7 or lower
If you are updating from version 1.0.7 or lower version, you will need to carry out the following steps:- Please deactivate and reactivate your plugin. This is to allow plugin to reconstruct it’s WP-Cron schedule.
- If you have existing Subscription Plans that use Stripe as the payment gateway, you will have to delete these plans and create new Stripe Subscription Plans. Existing plans will not work because they are not registered with Stripe’s Subscriptions API. This does not apply to Subscription Plans that uses PayPal as the payment gateway.
*** We strongly advise you to try out latest version on a staging website first in order to understand how it works before deciding whether to update on your live website. ***
Setting up WebHook in your Stripe Account
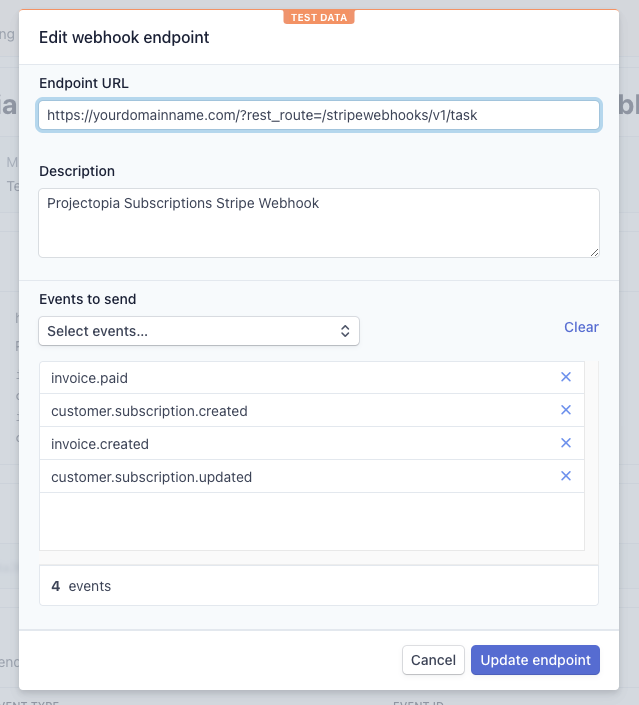
You will need to setup Webhook in your Stripe Account in order for Stripe to communicate with your Projectopia by sending “event” data to your website.- Login to your Stripe Account.
- If you are testing, please click on Viewing test data switch.
- Go to Developers -> Webhooks
- Click on Add endpoint button.
- Fill in the endpoint URL as follows https://domain.com/?rest_route=/stripewebhooks/v1/task Replace domain.com with your own domain name.
- Select the following events. invoice.paid customer.subscription.created invoice.created customer.subscription.updated
- Click update endpoint button when you are done.
*** Note: You will need to setup webhook again in live mode when you are ready to go live ***
Setting up Stripe API Keys
- Login to your Stripe Account
- If you are testing, please click on Viewing test data switch.
- Go to Developers -> API keys and copy your Publishable key and Secret key.
- Login to Projectopia using a WordPress Administrator or Projectopia Admin account.
- Go to Projectopia -> Settings -> Payment Gateways
- Enter your Publishable key in the Stripe Public Key option and enter your Secret Key in the Stripe Secret Key option. ( NOTE: It will cause fatal error, if you did not enter into the correct option or your API key is wrong. Please copy carefully. )
*** Note: You will need to switch to use live API keys when you are ready to go live ***
Create Subscription or Subscription Plans
The procedure for creating a subscription or subscription plan is basically the same as before. You can refer to the documentation on Adding a subscription plan and Adding a subscription. The only difference you will see are the Stripe Plan Ids in your Subscription Plans table. These ids will serve as a reference for Projectopia to communicate with Stripe. You can login to your Stripe account -> Products to view these plans.How to Activate a Subscription Plan
-
- Projectopia Client will login to their account
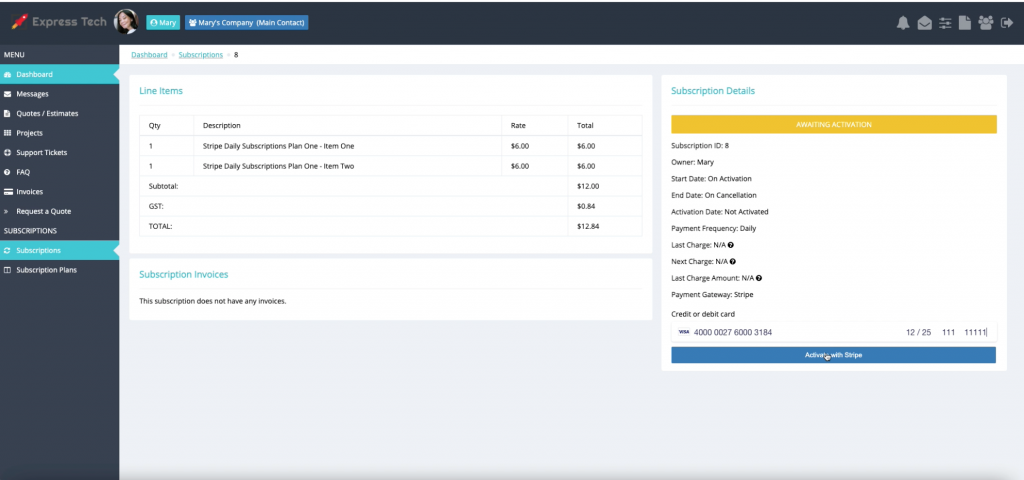
- Go to Subscription Plans to click on subscribe button, or go to Subscriptions to click on a plan that has the status of Awaiting Activation.
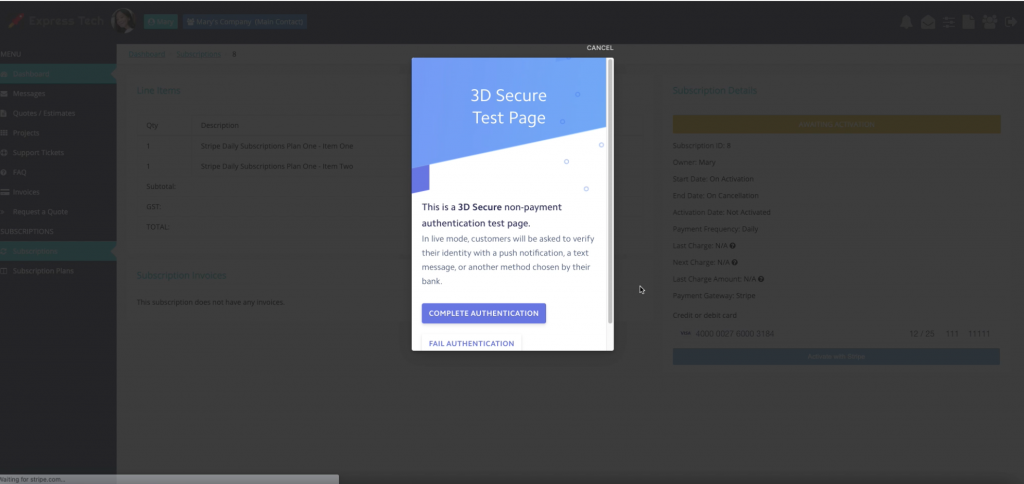
- Enter a valid credit card number. If you are testing, please use card number 4000002500003155 which is a Stripe test card. ( https://stripe.com/docs/testing#regulatory-cards ) and enter any valid expiry date and zip code.
- You will see an authentication dialog if your credit card requires authentication.
- Complete the authentication and your subscription will be active.
Marking Subscription as Active and Sending Invoice
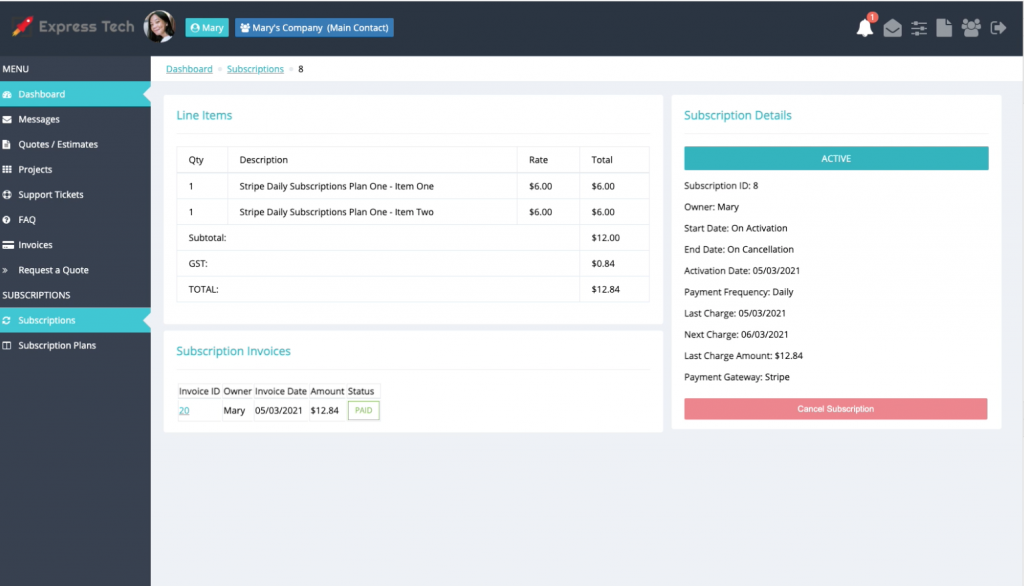
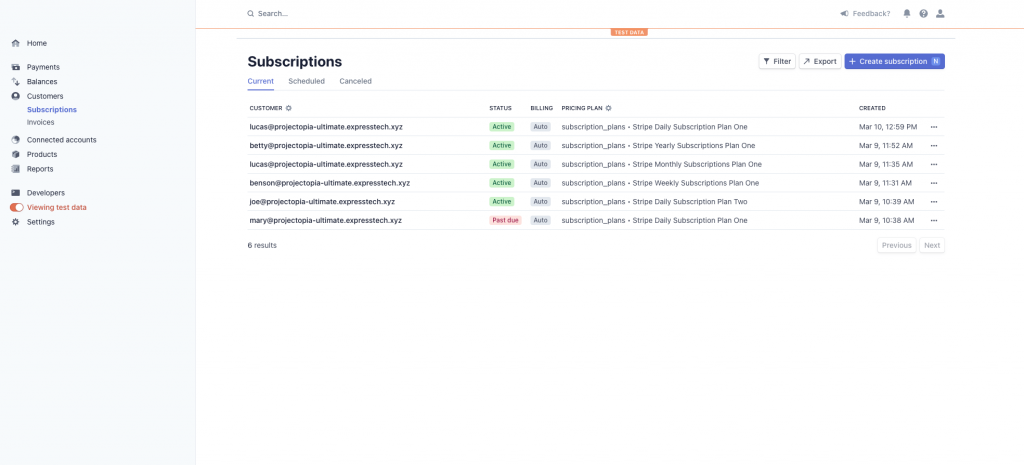
After your Projectopia Client has activated a subscription plan. Your client will have to wait for a few seconds before manually refreshing their browser. This is because Projectopia is waiting for Stripe’s Webhook to send it’s confirmation data. Once the payment is complete, Stripe will notify Projectopia via Webhook and Projectopia will create an invoice to your client, as well as marking the subscription as Active, Please see screen-shot of an Active Subscription with an invoice.
Cancelling Subscription
Projectopia Admin and Projectopia Client has the option to cancel a subscription via their client dashboard.Failed Subscription Payment
Credit Cards that require 3D secure authentication for every transaction, may fail on subsequent automatic subscription payment. In this case, your client will be notified to complete authentication of their automatic payment in their client dashboard.View Subscriptions and Payments in your Stripe Account
-
- Login to your Stripe account
- If you are testing, please click on View test data switch.
- Go to Customer -> Subscriptions and you will see your list of Customers ( subscribers ).
- Click on your Customer ( subscriber ) in the table and you will be able to see all the automatic payment for the Customer’s subscription.
*** Note: Please do not use real Projectopia client accounts for testing or in test mode. Please create test client account for testing and use only in test mode. Do not reuse any email address. All email address has to be unique. ***